Muffler
Established Member
- Joined
- Aug 31, 2024
- Messages
- 270
- Reaction score
- 313
- Points
- 96
- Location (town/city + country)
- Bucks, UK. XPower.
- Driving
- MG4 (2022-2025)
Nice one! Placed the order for mine yesterday, in black…
")


")
I remembered by chance, that I had tucked away in the recesses of my garage, from back in the day, a new (now old stock!) Webasto Hollandia 300 Classic large, electric tilt and slide sunroof kit from 2007! (Yes, I'm both weird and old!(ish)) I was a bit of a sunroof enthusiast back in the day and have fitted a few Webasto roofs over the years, including a couple of these to previous cars I owned back in 1996 & 2006. They're a really high quality product. Sadly these are no longer available to buy due to a lack of demand, as cars mainly now come with sunroofs if desired and/or most people no longer modifying cars due to Leasing/PCP non ownership models being the norm in todays world.
View attachment 33105
So I dug it out and had a look at it for size. (Assuring my better half it's going back in the garage after I've finished taking measurements!)
View attachment 33106
It's still a big "maybe" at this point, but I've done some preliminary measurements on the car and studied pictures of it's sister, the Roewe iE5, that does have a sunroof and it's looking like a feasible proposition. so watch this space.

I had my 2 year old in for a service last month. When I collected it, I was told that the gas struts for the bonnet were “an unauthorised modification” and that my warranty could be affected. Quite ridiculous - they don't adversely affect the car in any way. In any case, the car is owned not leased, so why do I need permission to modify my own property? I said that I had also changed the floor mats for others - do I need authorisation to do that? And where does the warranty T&C say authorisation is needed?Anybody knows what effect such modifications have on MG’s 7 year warranty?
Utter crap and I'd have told them so as well. You can do as you like with your own car!I had my 2 year old in for a service last month. When I collected it, I was told that the gas struts for the bonnet were “an unauthorised modification” and that my warranty could be affected. Quite ridiculous - they don't adversely affect the car in any way. In any case, the car is owned not leased, so why do I need permission to modify my own property? I said that I had also changed the floor mats for others - do I need authorisation to do that? And where does the warranty T&C say authorisation is needed?
It's things like this which take the shine off the ownership experience!
It was a simple case of remove one of the hinge nuts, fit bracket 1 & refit the nut. Remove the rear bolt for the headlight, fit bracket 2 & refit the bolt. Clip the strut to the two brackets. No modifications to the car.Utter crap and I'd have told them so as well. You can do as you like with your own car!
The only thing they could possibly effect is if they caused any issue with the bonnet metalwork, ie, if they caused any damage to hinges or the bonnet itself, or rusting at the point they're mounted then the warranty wouldn't cover that of course.
I absolutely can't stand dealers, it really irks me having to have them even touch my car once a year for servicing. Nothing but BS and overcharging for mediocre service.
Even if you were to make extensive modifications, they can only effect your warranty if a given modification can be shown to have caused the issue in the event of a claim. For example lowering springs will give them an excuse to refuse suspension related issues, which would be perfectly acceptable, but it wouldn't give them the ability to refuse a battery or paintwork fault.It was a simple case of remove one of the hinge nuts, fit bracket 1 & refit the nut. Remove the rear bolt for the headlight, fit bracket 2 & refit the bolt. Clip the strut to the two brackets. No modifications to the car.
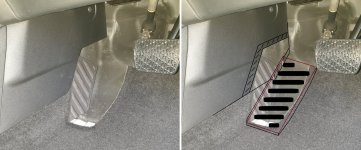
I've had an initial look at what can be done with the foot rest this afternoon and discovered it's actually easy to get out the foam block that makes it up. You just need to remove the panel to the right of the centre tunnel by removing a snap in plastic rivet and unclipping it. Then you unscrew a plastic carpet retaining nut under the pedals and the carpet can be pulled back from the corner with the foot rest to expose said block. It's bonded to the carpet with a thin layer of foam, but is easily teased loose and removed.
That's all I got done as it's got dark already, before 4pm! I now need to work out how best to rework the carpet neatly and fit a suitable, much lower, foot rest pad.
I'll photograph everything for reference once I've worked out what I'm doing and actioned it. For now, here's the block in case you were wondering what it looks like:
View attachment 33269
The 5 rest really is crazy high. I had a look at our LEAF for comparison, (which I find very comfortable for resting my left foot) and for comparison, the raised rest in that sits just above the carpet, about where I've drawn the green line!
I'll report fully with pictures as soon as I've done it.Would really appreciate if you could upload a few more pics as reference/guide. I'm terrible at DIY but really tempted to have a go reshaping the foot rest, which is the size of mount Everest.
Had no time as yet to continue beyond the initial removal! )
)When I did mine I used DemonPlates (GoogleMore slow progress!
...
Anyway, let's have a talk about number plates first.
) and they can do any size you want. Ig it's not on the size dropdown list you need to call. See the FAQ on the website.